

STITCH OF THE MONTH: HOUNDSTOOTH
January’s Stitch of the Month is the classic houndstooth! This timeless pattern is instantly recognizable for its bold, geometric look and striking texture. It’s a fun stitch to work because it creates a playful interplay of colour and shape.
I first discovered my love for this stitch when I commissioned it for a lemon peel blanket, which is essentially houndstooth without the colour changes. While working that piece, I realised how satisfying the stitch is to crochet and how beautiful the finished fabric looks. That experience inspired me to start the year with houndstooth for our Stitch of the Month series.
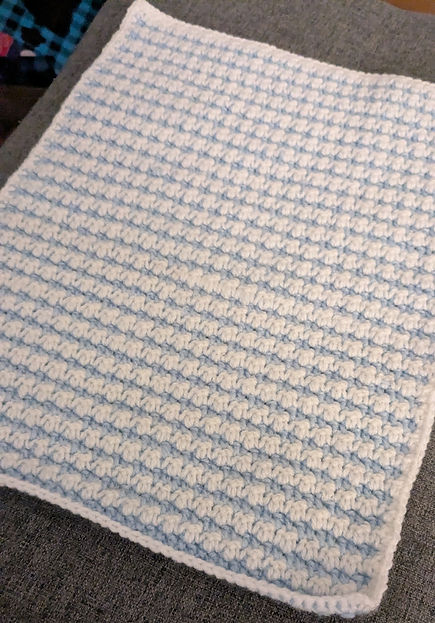
To make it feel right for January, I alternated pale blue and white to create a frosty, wintery panel that evokes ice and snow. The finished panel is not only a joy to make, but it also sets the tone for a fresh, bright start to the year — and a perfect first piece for your growing collection of SOTM panels!
Houndstooth Stitch
Pattern Notes
-
This pattern uses US terminology when referring to stitches
-
This pattern is for a panel with a border of 49sts x 76 sts
-
For this pattern, every row starts and ends with the same st (either a sc or a dc)
-
Blue rows start and end with a sc
-
White rows start and end with a dc
-
If adjusting this pattern to be bigger or smaller:
-
Odd starting chains will result in an even number of stitches
-
This will mean every row will start with a sc and end with a dc
-
-
Even starting chains will result in an odd number of stitches
-
This will mean every row will start and end with the same st (either a sc or a dc)
-
-
-
Regardless of how wide you make the piece, you should always finish with an even number of rows to ensure the top edge is straight
-
You do not need to cut either colour of yarn at the end of each row but you will be required to change colour at the end of each row and carry the other colour underneath your stitches
-
From R2 onwards, double crochets should be worked into a sc below and vice versa.
-
Always mark your first stitch
Abbreviations
sc = single crochet
ch = chain
dc = double crochet
RS = Right Side
WS = Wrong Side
Materials
Yarn: Woolcraft New Fashion DK in Cloud Blue (6f19) and White (7f76)
Hook size: 3.5 mm
Additional: Scissors, darning needle
Stitches, Techniques and Terminology
Fastening Off
-
ch1 and cut the yarn
-
Pull the loop on the hook until the tail comes through
-
Pull the tail to tighten
Changing Colour
-
Complete the final stitch of Colour A
-
Pull up the active loop and remove the hook
-
Reinsert the hook under the front two loops of the stitch
-
Pull through a loop of Colour B
-
Crochet over Colour A for at least one stitch to secure it
-
Pull the tail of Colour A to hide the the active loop
Carrying Yarn
-
Insert hook into the stitch
-
Place yarn to be carried over the hook
-
Yarn over with current yarn
-
Pull the working yarn under the carried yarn and back through the stitch
-
The yarn to be carried is now secured within the stitch and the stitch can be completed
Working Yarn
-
The yarn you are currently working with
Stacking Single Crochets
-
Of the two loops you have just pulled through from your previous stitch, insert your hook under the one furthest away from the hand holding your hook
-
Yarn over and pull through one loop (2 loops on the hook)
-
Yarn over and pull through two loops
Houndstooth Stitch Written Pattern
R1. Cloud Blue (RS)
-
ch50
-
sc into the second ch from the hook
-
dc in the next st
-
(sc, dc) x 23
-
sc in the last ch
-
Change colour to white
-
Turn (49)
R2. White (WS)
-
sc into the first st
-
stack a sc on top
-
sc into the next st
-
(dc, sc) x 23
-
dc in the last st
-
Change colour to Cloud Blue
-
Turn (49)
R3. Cloud Blue
-
sc into the first st
-
dc in the next st
-
(sc, dc) x 23
-
sc in the last ch
-
Change colour to white
-
Turn (49)
R4 - R49. (46 rows)
Repeat R2 - R3 23 times
R50. White (WS)
-
sc into the first st
-
stack a sc on top
-
sc into the next st
-
(dc, sc) x 23
-
dc in the last st
-
Do not change colour
-
Turn (49)
-
Move straight onto the edging
Edging (RS)
White
Top
-
sc into the first st
-
sc x 48
-
You should have 49 sc on this edge
-
-
ch2 and sc back into the last st of R50
-
This additional sc is the first st of the first long edge
-
-
Rotate the work 90 degrees to work down the side
First Long Edge (top to bottom)
-
*sc half way down the white dc
-
All white stitches at the end rows are dc and require two edge stitches
-
-
sc into the blue sc edge stitch
-
This is where the bottom of the white dc meets the top of the blue sc
-
-
sc into the top of the next white edge stitch
-
This is where the bottom of the blue sc meets the top of the white dc*
-
-
Repeat from * to * until you have 75 sts
-
sc into the chain under the last blue sc
-
You should have 76 sc on this edge
-
-
ch2 and sc back into the chain under the last blue sc
-
This additional sc is the first st of the bottom edge
-
-
Rotate the work 90 degrees to work along the bottom
Bottom
-
-
You will be working into the bottom of the original chain for this edge
-
-
sc into each of the remaining chains
-
Do not try and work into the 50th chain
-
You should have 49 sc on this edge
-
-
ch2 and sc back into the last ch
-
This additional sc is the first st of the second long edge
-
-
Rotate the work 90 degrees to work up the side
Second Long Edge (bottom to top)
-
*sc into the blue sc edge stitch
-
This is where the top of the blue sc meets the bottom of the white dc
-
-
sc half way up the white dc
-
All white stitches at the end rows are dc and require two edge stitches
-
-
sc into the top of the white edge stitch
-
This is where the top of the white dc meets the bottom of the blue sc*
-
-
Repeat from * to * until you have 76 sts
-
ch2 and sl st into the first st from the top edge
-
Fasten off
Happy crocheting! May this panel be the perfect start to your year of stitches!

.jpg)
